Today were here to share with you an assortment of St. Patrick inspired meals. Varying from authentic Irish dishes all the way to drinks, or fun simple and quick treats. Hope you enjoy and try one of these for St. Patties day!!
Irish Meat Pies
Ingredients:

- 1 tbsp olive oil
- 1/4 head green cabbage or more
- 1/2 lb red potatoes
- 1lb ground beef
- 3 tbsp tomato paste
- 1/2 tsp Worcestershire sauce
- 1/2 tsp dried thyme
- salt+ pepper
- flour
- 2 pie crusts
Directions:
1. Heat oil on medium heat in a large saucepan. Slice the cabbage into strips, and cut the potatoes in half and put into the pan. Cook for 7-9min or until it begins to soften and brown.
2. Take the beef and put into the pan, and break up with a spoon. Cook the meat until it is fully cooked and their is no pink.
3. Once cooked stir in the tomato paste, Worcestershire sauce, thyme, and 1 cup of water. Stir everything together then cover and cook on low-medium for 15min or until the potatoes are tender.
4. Once tender mash up the potatoes with a fork and season with salt + pepper to taste. (Based on preference you can mash your potatoes more, or you can keep them more cubed if you don't like mashed potatoes.) Once broken let the mixture cool completely.
5. Taking the pie crust cut each into 4 so you can have 8 pieces. Taking the dough cut it into a circle or make into a square. Once you have the flattened and shaped dough scoop about 1/2cup of the cooled filling and place on the dough. Then take the dough and fold over so have a rectangle, or half of a circle. Using a fork crimp together the edges so everything stays together then cut 3 slits in the top of the pie.
6. For these pies you can freeze them for later or use bake them right away. For freezing you need to take your pies and place onto a baking sheet and freeze for about an hour. From there you can then wrap each individually in tinfoil, or saran wrap. Taking each individual pie you can then put them all in a gallon freezer bag and you have an easy weeknight meal.
7. For baking your oven will be at 400
°. Taking your pies place onto a foil lined baking sheet, and coat with a water wash (this is necessary as it helps the crust to crisp-en up). Taking the pies place into the oven for 30min if frozen or for 10-12 if not, rotating the sheet half way through. Once dough is cooked and begins to brown take out and enjoy!
Apple Clovers: Great as an easy a quick treat or snack

For this recipe you can feel free to make it as simple or complex as you would like. The basis for this is a green apple, which you cut into slices then using a cookie cutter you cut into a clover. If you want you can have it as is as a fun festive snack, or you can take it a step further and place on a cookie or pie. You can use our
sugar cookie recipe or the
apple gallete recipe. When using these recipes remember that the apples take about 10 min so you may need to begin baking the base before the apple goes on top. Using our recipes or someone else you can dip the apples in lemon juice, brown sugar, and cinnamon so the apple doesn't dry out or another liquid. If you want to make these with the apple gallete recipe coat the apples in the lemon juice cinnamon and sprinkle with the sugar on top. Overall though feel free to be as creative as you would like, and let the clover inspire your creativity.
Mint Chocolate Chip Milkshake
Ingredients (for one serving) :
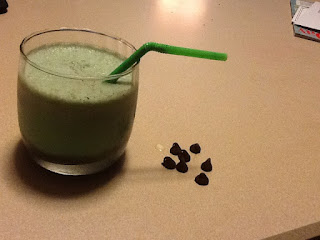
- 2 scoops of vanilla ice-cream
- 1/2 cup of milk
- 1 teaspoon of mint extract
- 4 drops of green food coloring
- 1/4 cup of chocolate chips
Directions:
1. For this recipe simply combine all ingredients in blender and blend until reasonable. If you like your milkshakes thicker, add a couple ice cubes. I also found that smashing the chocolate chips before putting them in decreases the chance of big chunks.
Jumbo Shamrock Sugar Cookies
Ingredients:
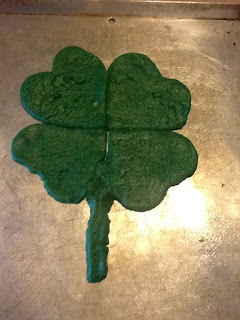
- 2 cups of flour
- 1 teaspoon of baking soda
- 1 1/2 stick of butter
- 1 cup of granulated sugar
- 1 tablespoon of vanilla extract
- 1 egg
- green food coloring
- 1/2 cup of powdered sugar
- 1 teaspoon of milk
- 1 teaspoon of vanilla extract
Direction
1. Combine flour, baking soda, butter, sugar, vanilla extract, and egg in a large bowl until light brown and creamy. Then, add in a few drops of green food coloring and knead dough with your hands until all of the dough is a vibrant shade of green.
2. Roll out the dough evenly and cut out shamrock shapes. If you don't have a shamrock cutter, you can use a heart cutter. (A shamrock is just 3 or 4 hearts and a stem!) Then, lay the cookies on a greased pan.
3. Cook cookies at 400 degrees F for 8-12 minutes.
4. If you would like to add icing, combine powdered sugar, milk, and vanilla extract in a small bowl, then add whatever design you would like. Have fun with it! For a fun party idea, you can prepare plain cookies and have your friends decorate them!